18 April 2013

divided basket

Noodlehead created the coolest pattern for a divided basket.  The divider helps the basket keep it's shape - it is sewed into the sides and bottom.

During one very long week where I watched jobs run on the computer at night, I stared at multiple pictures and blog entries on this basket - and made my own pattern.  This basket is big.  13.5" x 7.5" x 7.5".   But it's also the perfect size for a 'portable diaper changing station' gift. 


The left side is stuffed with diapers.  The right side has a blanket, outfit, Butt Paste, a couple of burp rags, and small package of wipes.   (I told you it's big!)  The outside fabric is a bottom weight fabric I found at JoAnns.  The lining is duck canvas.  Both layers are interfaced.  I love the orange canvas stripes on the handles.

I finished this bag just in time.  I cut it out on Thursday night.  My friend V. came over for sewing help on Friday night.  I was still fusing interfacing and just starting to sew it.  She commented several times that she thought it was really cute.  It was all I could do to make comments like 'I hope it turns out the way I expect'.  She was so excited when I showed up to her baby shower the next morning with this basket.  :) 

Then I had to make two more with some dinosaur fabric I have.


I'm not sure what I'm going to use these for, but they sure are cute.  I'd like to try it again with some quilting weight cotton.  Duck cloth + bottom weight + 2 layers of interfacing gets thick!. 

25 March 2013

more drawstring bags

I love these drawstring bags.  I made several back in April and I adore them.  They're the perfect size and I use them all the time.

In November, two of my favorite people had a birthday.  I decided that they needed a drawstring bag.  They are sisters - twins - but oh, so wonderfully different.  It was so hard picking out fabric.  I wanted them to have fabric that matched their beautiful personalities.  (Their Mom told me I got it right.  yea!)

Grey with pink flowers for one.  The lining is a coordinating print with little flowers.


A wild pink/turquoise/lime print for the other, lined with a Kona solid in blue and a hot pink tie.


I didn't quite get them finished in time for their birthday, but it was close!


Stats:  all fabric from JoAnns; 11.5" tall, 8.5" wide, and 4" deep; 1/2 yard of fabric for outer and lining work perfectly.

22 March 2013

The almost never finished quilt.

Hello, little blog of mine.  It's been a long time since I've updated.  Not because I stopped sewing - I was just too lazy to post.  :)

My latest finish is also my longest 'work-in-progress'.  I started this quilt a few years ago.  (uh, at least 7 years.  Quite possibly longer.)  I fell in love with it at a quilt store and bought a kit.  It was originally part of a 'mystery quilt'. 


The plan was that this would be the quilt for my bed.  But I would either need really big boarders or more fabric.  The fabric line is called 'gatherings' and in 2007, I was able to find a fat-quarter bundle of it on-line.  But then I needed to find cream fabric that matched.  I couldn't - so I finally settled for something that would work.  I cut enough fabric for 21 more blocks - and put it all in a Rubbermaid bin.

Fast forward to February, 2013.  I pulled out the bin and I'm seriously questioning my tastes.  Uck.  My fabric tastes have changed and my skills have definitely improved.  (Nope, no close-ups of those points are going on the blog.)   But, it's unfinished and I can't bring myself to throw out fabric.  My plan was to work on it for two weeks and see where I got to and evaluate how much more work I wanted to put into it.

At the end of the two weeks, I had 21 more squares finished to add to the existing 20.  I laid it out on the living room floor and had the realization that I needed twenty-two more blocks to add another row of blocks all the way around the quilt.  I was one short.

Nope.  Not doing it.  I'm not sewing one more block for this quilt.    Two throw size quilts would be perfect.


(But, I will be undoing it to fix the one block that has a piece sewn on backwards.)

I have enough fat quarters left over in cream/tan/yellow to piece backings.  Then these lovely quilt tops and backs will be donated.  I'm hoping there is someone out there who will still like these colors and use these quilts.

I'd like to think that I've learned my lesson about finishing my projects in a timely manner.   Let's get real here - it only took me 2 weeks to piece the blocks and then a Saturday afternoon to sew all 40 squares together.  Two weeks.   I could have found 2 weeks 6 years ago.   Or even 5 years ago.

Oh well.  At least I can say my longest work-in-progress quilt is done.  
stats:
fabric moda "gatherings"
size: 60" x 75"
pattern:'The Journey Home'

09 November 2012

nest triangle quilt

Around May, I took my very carefully horded 3 charm packs of Tula Pink's nest and turned them into half-square triangles.

I matched them up with 5 inch squares of Kona cotton white and sewed around all 4 edges.  They were each very carefully sprayed with spray starch (both sides) and ironed carefully.  Next they were cut diagonally, corner to corner, into 4 triangles.  Each triangle was opened, carefully ironed - with more spray starch - and then trimmed to 3".  The bias edges of the squares were never a problem - probably due to the 2 bottles of spray starch I used. :)  Here's the drawing I made in publisher to make sure that this would all work out.  (Technically, I could have trimmed to 3 1/8" ... but I wanted a bit more margin.)
 
All that work resulted in this:


That after much agonizing of layouts morphed into:


And evolved into piles of this in July.

I decided to back it in minky and searched for a long time trying to find something that would match.  Blue and aqua weren't quite right.  I even though of matching the 'watermelon pink', but I really didn't want a pink blanket.  I finally found teal minky on fabric.com and it matches close enough.

My first attempt at machine quilting was with the minky, two layers of cotton batting, and then the top.  It didn't seem that heavy or thick, but I could not get a consistent stitch length on my machine - even with the walking foot.  I think the minky fabric was just slick enough that the feed dogs wouldn't grab it.  I sewed about half of the horizontal lines before ripping it all apart and trying again with just one layer of minky.  That went much better, but I had to make sure the quilt was being supported at all times or the stitches would go wonky.   I had all of the horizontal and vertical lines (1/4" on both sides of the seams) and half of the diagonal lines sewn on one long Saturday.  One more evening of sewing finished up the diagonals and then it took a few hours of knotting and finishing the ends off inside of the quilt. Note to self: do not do that much quilting just to rip it out!

For binding, I bought Jade Kona Cotton and Azalea Moda Bella Solid.  They both matched the front pretty well, but the jade wasn't an exact match to the minky.  I decided to put a little sliver of the jade around the quilt and the bind it in the azalea.    I cut the jade at 1.25" wide, thinking I could fold it in half, 1/4 seam allowance, and still be able to see it.  Next time I'll try it at just 1" wide.  The binding is my standard 3" wide folded in half.  And both were cut on the bias.


An evening watching Madagascar 2 and 3 while babysitting and the binding was sewn down.

Here it is.  My Nest Half-Square Triangle quilt:


Here's the back.


I love this quilt. I love the colors, the texture, and the fuzzy back.  My only issue is that this quilt is warm!

Quilt stats:
fabric - Nest by Tula Pink and White Kona Cotton.  Backing is Minky Cuddle 3 in Teal from fabric.com
straighline quilted by me on my Janome
Size: ~50" x 60"

22 October 2012

library bag

My nephew C. wants a library card (he's 6).  But to get a library card, he needs a library bag with a pocket.   Enter Oliver + S 'messenger bag' from 'little things to sew'.   It's ranked at 3 out of 4 scissors for difficulty (uh, bias tape!  lots of layers!  curves, lots of layers, and bias tape!)  But even with that, it went together pretty quickly.

Here's the front.  Can you tell that C choose the fabric? 


And the back.  (Don't look too close at the bias tape.  I'm getting better - but I still need more practice.)


The inside is lined with orange Kona cotton.  Yup, C picked that too.  The front expandable pockets have velcro on them.  Perfect for a library card.  There are also pockets on each side.


I changed a few things on this pattern.  There were two sizes for the pattern - kid size and  adult size.  I wanted the bag deep enough to put a few books in, so I used the adult size for the side pieces (3 1/2 inches versus 2 3/4 inches) and adjusted the length.   The back and front flap are all one piece, so I cut it in half  because of the directional fabric.  (It would not be good to have Star Wars characters upside down.)  I also lengthened the front flap with the hope that it would stay down since there isn't a fastener. I think it works perfectly.

The bag final dimensions are approximately 7 1/2" tall  x 10 " wide  x 3 1/2" deep. 

Since both of the fabrics are 'quilting cotton' weight, I lined them with decor bond.  It works great.  I also lined the bag with 'Duck Cloth' as recommended by the pattern.  It really helps to give the bag body and shape.  The only place I wish I had cut it down was on the strap.  By the time you fold the strap in, it was 4 layers of fabric and 4 layers of duck cloth.  That's do-able.  But the 8 layers of fabric and 8 layers of duck cloth where the strap pieces are folded in half was not fun.  Broken needle and hand cranking the sewing machine.  Ugh.  I'm hoping that I got enough stitching in them that they will stay put.  If I did it again, I'd cut the duck cloth for the straps at 1/2 of the width, resulting in 2 layers once it's folded.

And here's a shot of what it was like to sew around the bag.  I've got to remember to buy some 'binder clips' to use instead of pins for situations like this.  I bent most of the pins and ended up throwing them away.


The pattern consists of 9 pieces and two additional rectangles to cut out.  Plan to spend a couple hours cutting - outside, inside, duck cloth lining, interfacing for outside and inside.

It also requires a strap adjuster and rectangle slide.  I ordered mine off of Etsy.  The first order came quickly and then I realized that 2" hardware was not the right size.  I then ordered 1 1/2" wide hardware  - waiting very impatiently until it arrived and I could finish sewing.

C is delighted with his bag and he is now the proud owner of a library card.  It was definitely worth it.  I might even try the larger size next time.


14 October 2012

up, up, and away

A few years ago (3 or maybe it was 4) I decided to make 'superhero' capes for my nieces and nephews for Christmas.  I found a tutorial from 'puking pastillies /now 'georgia leigh' here.  I also found a web site that sold custom capes - 'plum pear apple'.  I liked them - but I didn't like the idea of using felt.  I wanted these capes to be washable and durable.  So I looked at the instructions/pictures and drew my own pattern. [update: I just found a another pattern for capes on pinterest that would also work.]

The first set I made were 'superheroes'.  I found logos on-line, traced the mirror image onto heat-n-bond lite, ironed it on fabric, cut them out, ironed them on the cape, and worked on my zig-zag skills while stitching around all of them.

I made Batman/Mr Incredible and Superman/Flash. (sorry - crappy indoor lighting at night.)


They were fun ... but I just didn't see my nieces liking the superhero capes.  But 'initial' capes would work.
 
So I made capes with their initial on the back and lined with fun fabric.  4 capes were made and sent off for Christmas  (without taking any pictures).  3 more capes were made and given to a wonderful friend's kids and a cousin as a sibling gift when her youngest was born.  (without taking any pictures).     I learned that my nephew C. was into superheroes, so I packed up my set of superhero capes and sent them to live with him.  At least I took pictures of them before they were mailed.  I hear 'Batman' goes to the grocery store, the library, Wal-mart ... pretty much everywhere.  Last year, C told me that his little sister needed a cape of her own for when they played together.  K got a cape for her 1st birthday.  (and some books because I didn't think she really cared if she had a cape.)   3 more were made for nieces and nephews. (without taking pictures)  2 were made for another friend's kids as a 'welcome the new baby' gift.   2 more were made for yet another friend's kids as a 'yea the new baby is here' gift.   I probably made a few more that I've forgotten about  ... and I still don't have pictures.  (uh, notice a trend here?) 

So this time - while making 2 more for a friend's kids as a "just because you're cute" gift, I finally took pictures.  


 Just a simple cape - but it's the project I make the most of.

08 October 2012

baby blankets times two

Way back in August my friend's twin daughters had a 'virtual baby shower' with family and friends.  One was due in August with a girl, the other due in November with a boy.  I was a few weeks late, but I wanted to make and send something to them.

I had bookmarked two different 'self binding receiving blankets' (everyday mom version, piece n quilt version) and this was the opportunity to make them.  I pulled out a very boy 'dog' print from my stash and found the perfect blue flannel with brown and white dots for the back.


My first try was a colossal failure.  Both are very straight forward tutorials, but I was very confused on how to mark the corners, what seam to sew, and what to cut.  No, that's not quite right.  I was convinced I knew exactly what I was doing, marked the corners, trimmed them, turned it right side out - and the corners were very, very wrong.   I had placed my ruler on the wrong edge and drawn my sewing line in the very, very wrong place.  (Note to self - line the ruler up on the folded edge.  And don't trim corners until you turn it right side out and check it.)  There was no way to 'patch' in fabric to fix it.  Luckily JoAnns still had some more dot fabric, so I took it apart and tried again.  (On the positive side, I now have blue dot fabric to make burp cloths with.)


I think they turned out great - and I'll make them again. The rule of thumb for the fabric is that the back fabric needs to be 10" wider and longer than the front piece.  I think they're just a bit fancier than two pieces of flannel sewed together and it's not hard to do at all.  Just don't trim the corners until you are positive you sewed the right line!

07 October 2012

Multi-Tasker Tote - (christmas sewing started!)

I actually started sewing for Christmas - and it's the first week of October. Yea!  (And I don't think she reads my blog, so it should be okay to show it off.)  

This is 'Anna Maria Horner's Multi-Tasker Tote'.   This is the second time I've made this tote (I made it with my sister last summer out of Ikea fabric.  I should post about that.) and I still really like it.
 

I love the outside pockets (big enough to hold a water bottle) and the inside is big enough to hold a binder - but it's small enough that you can actually carry it.


The construction is a bit different - and every time I'm kind of surprised how the side pockets are made - but it works.  I really like how the handles scrunch up the top of the outside pockets.  It's cute.  :)  It's made with 5/8" seam allowance - which seems HUGE after sewing 1/4" on my quilts.

The pattern specifies one pocket with a key clip and I added a second zipper pocket.   It's a  little tricky to put in because the lining seams runs vertically through the center of the zipper and that's the seam you leave open to turn the bag, but with a little bit of work and determination, it's do-able.  I couldn't match the citron lining color, so I choose grey for the zipper and pocket lining.


The fabric is called 'modern essentials' and I got it from JoAnns (with a coupon).  It's a home dec weight, but it's soft and has a really nice feel.  But definitely remember to use to use a 'jean' needle - I bent/broke 1 needle while making it.

One Christmas present down.  More to sew than I really want to think about.

23 September 2012

My summer vacation

Last month I spent a week at my sister's house in Walla Walla. I had the best time.  I wish I lived closer and was able to get there more often.   Whenever my sister and I get together, we work on 'projects'.  The sewing machine is going pretty much non-stop and  fabric is scattered everywhere.

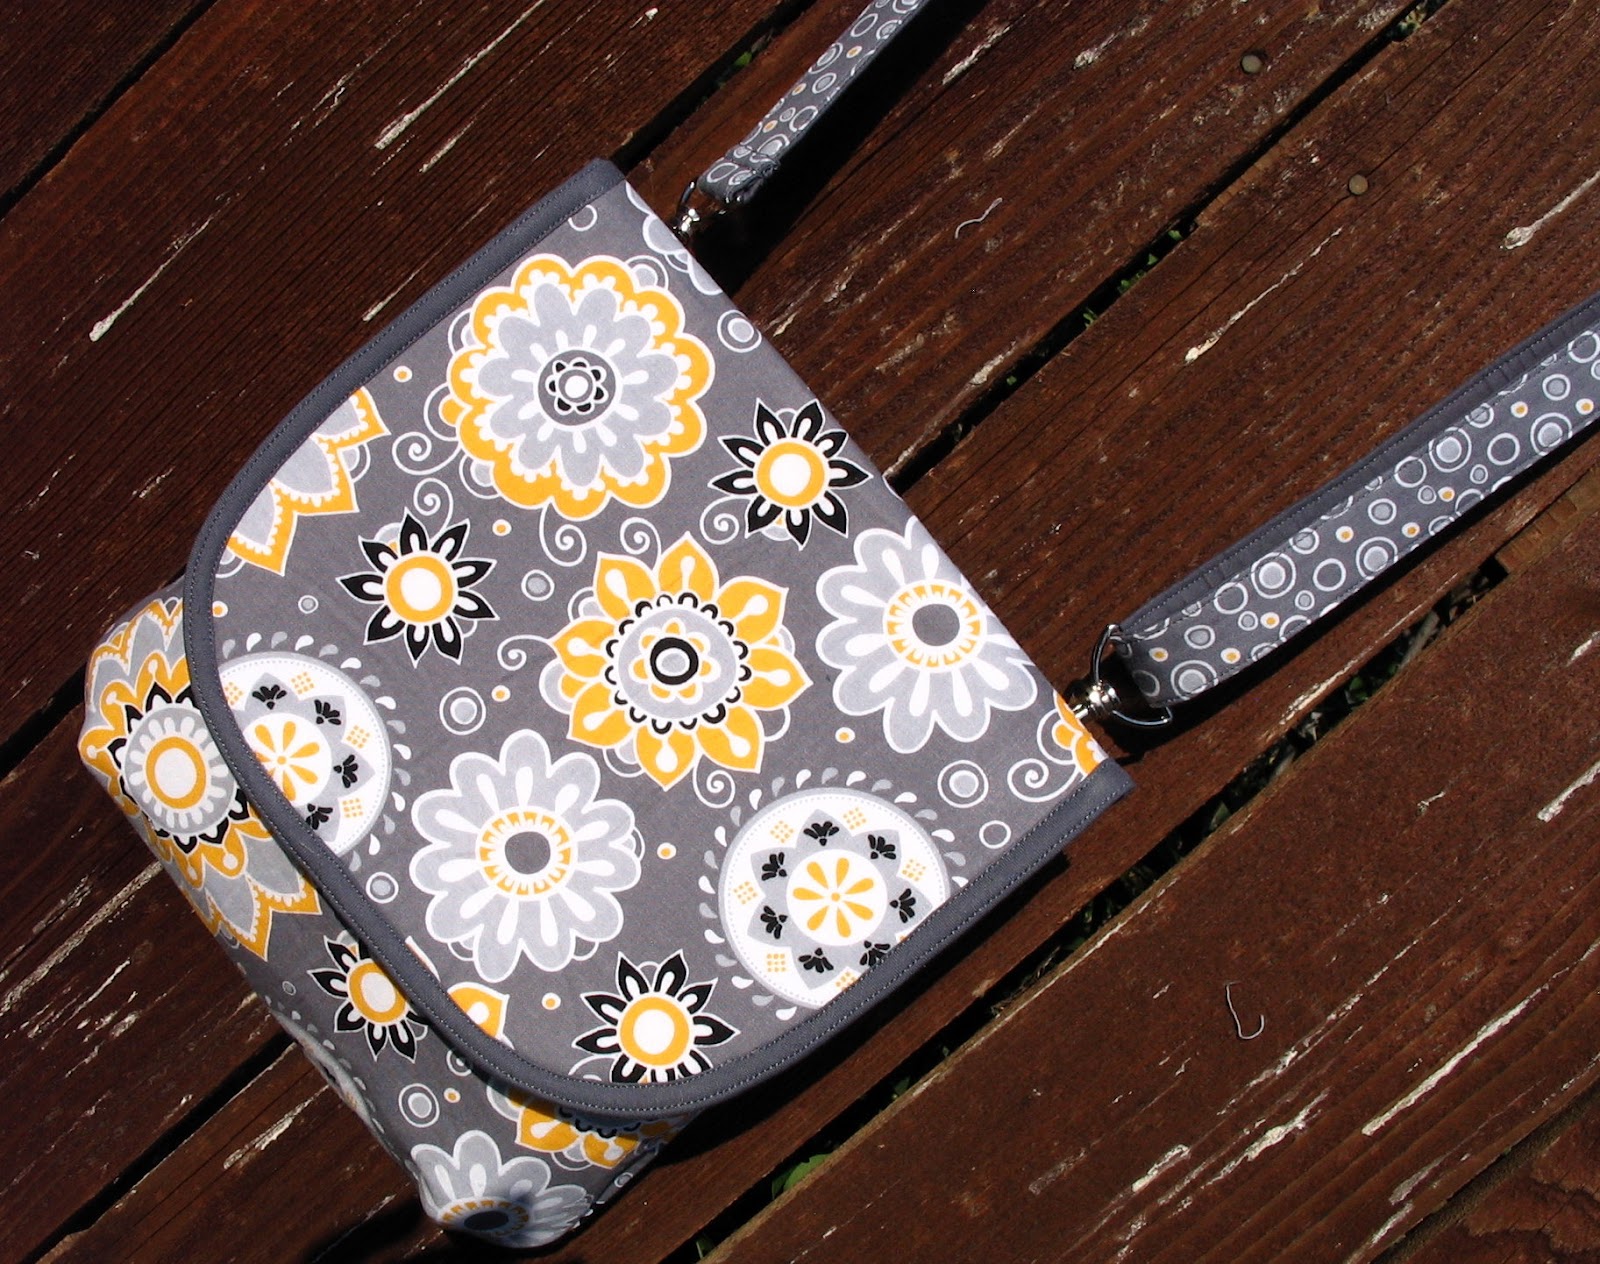
The sewing fun started before I went.  I wanted to bring something for everyone ('cause it's fun for favorite Aunts to bring presents).  I made my niece A the small version of the cross-body purse.

 I made my niece K two 'wide open zipper pouches'. 


These are the quite possibly my favorite sewing project of all time.  They're quick, fun, easy to sew, and turn out fantastic.  Plus they really do open wide!


They're now being used as K's toy and diaper bags for church.
 
I wasn't sure what to make for C.  He's 6.  And has opinions. :)  My sister suggested a pencil case after seeing a tutorial on make it and love it.  I liked the idea, but C is into monsters.  So I made a monster zipper case - with the zipper as the 'mouth'.  I used duck cloth for the case and fleece for the monster parts - zig-zagging around each piece.  (At first, it looked a little like an angry bird.  The purple horns helped!)  I think it turned out pretty cute. 


 I had so much fun making K's 'wide open zipper pouch', that I also made two more for C.


For A (not to be left out!), I brought fabric and let her make her very own pouches.  She did a great job once I remembered to put some blue tape on the sewing machine to mark where the seam allowance should be.  She did everything on the bags except for the final top stitching around the zipper and the hand sewing.  Yup, she sewed in the zippers all by her self.   For almost 8, she's pretty good with the sewing machine (as she reminded me several time that she knew what she was doing.)


Now for the 'projects'.  Last year we made bags.  This year was all about pillows.  The first up was a double flying geese circle - called 'Windmill'.  I first found this on flicker and tracked it back to Lily's Quilts.  She had a tutorial up on her web site and then took it down because it was supposed to be coming out in a book.  I waited a while ... and then drew up the pattern (in publisher!) for a 12" square.  (It's now available in 'Modern Blocks'.)   

We sewed a 'test square' to make sure I had drafted the pattern right and then dived into the project.  This was my sister's first try at paper piecing and she did awesome.  Here's mine - complete with safety pins as it's waiting to be quilted.
 

The great thing about paper piecing is that if you take your time, your points come out awesome.  The hardest about this block (other than deciding what fabric to put where ... and I made my sister choose that) was the center point.  There are a lot of fabrics there and it's tough to get the point pretty.  It's a little bumpy in real life, but I like it.

Next up was 'lone starburst' or 'bordered star'.   I found it on pinterest and the paper piecing template is from the 'Quilting Climber'.  It turned out amazing.  The hardest part was deciding how to quilt it.  Here's mine:


I quilted about 1/16" away from all of the edges and then echo quilted the star out to the boarder. 
 

Last up was 'alphabet soup' inspired by this quilt pattern - Circular Reasoning by Carolina Patchworks.  Everyone looks at a quilt that is 75"x75" and decides that it would be really cute 12" square - right?  A trip to her local quilt store 'Stash' (perfect name for a quilt shop) and we had fabric and started tracing, ironing and then I cut them all out.


This is as far as we got.  The next step is to blanket stitch around all of the letters and then I think a boarder of dark brown around it will look nice.  I'd like to pebble quilt stitch it ... but since my free-motion quilt skills are non-existent, I'm not sure how I'll quilt it.

One night - I think it was Tuesday, a little boy prayed that I would have enough time to sew his pajamas.  So I spent the next day sewing monster pj short's.  I had just enough fabric to sew two pairs.  I used the left over fabric to sew shapes on two of his t-shirts - a circle and rectangle.  I think he likes them. :)


We also ran 3 mornings (I fell and skinned up my knees and hands really good the first time, but the rest were injury free).  We back-to school shopped for clothing for the kids, made a Costco run, watched a you-tube video and then cut A's hair (a bit scary, but it turned out cute!), celebrated my birthday, found and bought a mountain bike for C, practiced 'launching' and stopping on the new bike, sewed, visited parks, rode bikes, embarked on the 'great library book hunt' (they were found in the Candy Land game box), bought and played with legos, ate frozen yogurt, sewed, had 'Popsicles with the Principle, sorted school supplies and labeled everything, played on playgrounds, sewed, made sidewalk chalk paint and played with it, went to the library, read 'Ninjago: Jay, Ninja of Lightening' with C every morning (he read all but one chapter to me!), made cookies, made bread, made dinners, played with toys and kids, embroidered 'church' in C's new church pants (so he could tell them apart from his brown school pants), fixed the stuffed snake Slither, fixed a bag, and sewed, sewed, and sewed some more.  I had so much fun.  It was the very best part of my summer.


I had so much fun that it was hard to leave and come home.  Now to start planning for next year's trip!

12 August 2012

cross-body purse: sew serendipity

I checked out the book 'Sew Serendipity Bags' from the library and absolutely loved the book.  So many great bags ... it was tough to pick which one to make first.

Here's the 'cross-body purse'. 


They turned out really cute. I found the fabric at Hobby Lobby (yup, they have cute fabric!) and paired it with kona cotton charcoal.


The small bag is 9"x7.5", the large bags are 10"x9".  I swapped out the 'twist' lock and used magnetic snap closures ... since that's what I had. 


I adore the hardware on this bag.  I found the swivel clasps and d-rings at Hobby Lobby (1/2 off.  Yea!)  I finally found the double-loop slider (the cool piece of hardware that lets the strap be adjustable) on etsy.   I interfaced them with my favorite super thick and stiff interfacing peltex 71 and craft-fuse.

 
This bag was rated as 'intermediate' - and it definitely is.  I need a bit more practice sewing bias tape. It looks okay from the front, but it's not so pretty from the back.  And sewing the flap to the bag body didn't go smoothly.  It took several tries, 2 broken needles,  and I finally called it good enough.  No pictures of that seam, but trust me - it's icky.

I like them ... but they're just not as useable as I wanted them to be.  They'll hold a wallet, keys, a really small cell phone, and maybe a tube of chap stick.  But that's it. I don't think you could even squeeze in a pen or tissues.  The opening needs to be completely flat in order for the bag to close.   Other than that, they're adorable.  I'm just not sure what I'm going to use them for.